Shellfoundry
Shellfoundry is a command-line utility that allows you to easily create, package and install Shells in CloudShell. It allows creating basic Shells or Shells based on a common 1st or 2nd generation Shell template.
Notes:
- In order to use shellfoundry on an offline computer, you will need to first download the shellfoundry templates locally and configure shellfoundry to run in offline mode. For details, see Downloading shellfoundry templates.
- Shellfoundary cannot work if there’s a proxy server present between the shellfoundry machine and the remote Quali Server machine.
In this article:
Usage
Installation
This command installs Shellfoundry on your computer. For more information, see Getting Started.
Syntax:
pip install shellfoundryTo install a specific shellfoundry version, run: pip install shellfoundry==<version>
For the version history, click here.
Upgrade
If you already have shellfoundry installed on your computer, run this command to upgrade it to the latest version. For more information, see Getting Started.
Note: To prevent backwards compatibility issues, old versions of shellFoundry are disabled with every new shellfoundry release.
Syntax:
python -m pip install shellfoundry ––upgradeConfiguring CloudShell settings
(Required) This command sets the CloudShell Portal settings and user access credentials in Shellfoundry. Note that in offline mode, the shellfoundry list command lists the shell templates residing locally in the folder defined in the shellfoundry config’s template_location attribute. For more information, see Getting Started.
Syntax:
Run this command from the Shell’s root folder.
shellfoundry config <key name> <key value>Example - Setting the username:
shellfoundry config username adminThe following keys are available:
- username: CloudShell username. For example: “admin”.
- domain: CloudShell domain. Note that for 2nd Generation Shells, the domain must be “Global”.
- github_login: GitHub username. To be used to download shellfoundry templates via
shellfoundry get_templates. - github_password: GitHub user password. To be used to download shellfoundry templates via
shellfoundry get_templates. - defaultview: Set the default view. Possible values are: gen, gen2, all and layer1. Default is gen2.
- online_mode: Shellfoundry computer’s mode (online or offline). Online mode (
True) is the default. in online mode, shellfoundry templates on GitHub are used, while for offline mode, you will need to copy the shellfoundry templates to your local machine. For offline mode, usetemplate_locationto define the local templates folder. - author: The author to be specified on the shell (in the shell’s metadata).
- template_location: (Required if
online_modeis set toFalse) File system path to the folder containing the offline shell templates. Alternatively, you can specify the template location using “local:” when running ‘shellfoundry new’ in command-line. - password: CloudShell password (encrypted).
- host: The hostname or IP address of the CloudShell Portal machine.
- port: The port to be used for Quali API. Default is “9000”.
Creating a Shell
The new command creates a shell from a shell template.
Syntax:
Run this command in the Shell’s root folder.
shellfoundry new <Shell-name>Options:
- --template: Creates a shell from a specific shellfoundry template, featuring the template’s settings, attributes and driver commands. For details, see Modeling Shells with TOSCA.
Note: If you don’t specify a template, shellfoundry will create the shell from the gen2/resource template. Use this if you want to create a Shell to customize or experiment on. For more information, see The Shell Project Guide. - --version: Creates a shell based on a specific shell template version. If you don’t specify the version, shellfoundry will create the shell using the latest shell version that is supported by your CloudShell installation. For details about each version release, see CloudShell Standards.
- --python: Determines the python version of the shell. Options are “2” or “3” (Default is 2).
Examples:
Generic resource shell based on python 3:
shellfoundry new my-basic-shell --python 3Networking switch shell version 5.0.2:
shellfoundry new my-switch-shell --template gen2/networking/switch --version 5.0.2Creating a Shell from a local template
This section explains how to create Shells using a Shell template that isn’t online for some reason. For example, you want to use a Shell template you are currently developing.
Syntax:
Run this command from the directory that will contain the new Shell:
shellfoundry new <new-shell-name> --template local:<path-to-template’s-root-folder>The path can be a URL to the Shell template’s zip package on GitHub or the filesystem path (prefixed by local:./) to the extracted zip folder:

Example:
shellfoundry new my-service-ext --template local:C:\Temp\shell-pdu-standard-master The new shell is added to the path from which you ran the shellfounfry new command.
Deleting a shell from Cloudshell
Starting with CloudShell 9.1, it is possible to delete shells that are installed on CloudShell. Note that you cannot delete shells that have resources.
Syntax:
shellfoundry delete "<shell name>"Where the shell’s name is the name of the shell, as displayed in CloudShell Portal’s Manage - Shells page.
Example:
shellfoundry delete "Juniper JunOS Switch Shell 2G"Downloading shellfoundry templates
This command downloads all shellfoundry templates from GitHub, which you can use to create shells in offline mode. Note that shellfoundry uses GitHub API to fetch the templates, so you will need to set a GitHub user (via shellfoundry config) to grant shellfoundry unrestricted access to GitHub API. For details, see this GitHub Developer article.
Syntax:
Run this command from the directory that will contain the shell templates:
shellfoundry get_templates <CloudShell version>Optionally, add --output_dir="<containing_folder_path>" to set a different containing folder.
Example:
shellfoundry get_templates 9.1 --output_dir="c:\users\steven.g\shell templates"Shellfoundry downloads the latest template versions that are compatible with the latest patch of the specified CloudShell version.
Listing available Shell templates
This command lists the 1st and 2nd generation Shell templates you can use for your new Shell. For more information, see Modeling Shells with TOSCA.
Note that in offline mode, the command lists the shell templates residing locally in the folder defined in the shellfoundry config’s template_location attribute.
Syntax:
shellfoundry listTo view templates of a specific type, add the appropriate flag to the command: --gen1, --gen2, --layer1, --all (lists all available templates).
Listing versions of a Shell template
To display a list of the versions for a given template, run the following in command-line:
shellfoundry show <template_name>The versions are displayed in descending order from latest to earliest.
Packaging a Shell
This command packs the shell’s source code, data model and configuration into a ZIP package, which can be uploaded into CloudShell. For additional information, see Deploying to Production.
Syntax:
Run this command from the Shell’s root folder.
shellfoundry packA ZIP package is created in the Shell’s dist directory with the name “nutshell.zip”.
Note: The pack command requires the presence of a shell.yml file, which is created by default in Shells created using Shellfoundry. However, if your shell was created elsewhere, make sure to add a shell.yml file with the following structure:
###shell.yml

 shell:

     name: nutshell
Packaging a shell’s dependencies
This command creates a zip file in the shell project’s dist folder that includes the shell’s dependencies. This is especially useful for offline mode and during shell development.
Run this command from the Shell’s root folder.
Syntax:
shellfoundry distBy default, the command downloads the dependencies from public PyPi. However, if you are developing the shell and have some custom dependencies that are not in public PyPi, add the --enable_cs_repo flag to also include the shell’s dependencies from your local PyPi repository folder.
Packaging and importing a Shell into CloudShell
This command creates a distributable zip file for the Shell and imports it into CloudShell using the CloudShell Portal and user defined by the shellfoundry configure command. For more information, see Getting Started.
Syntax:
Run this command from the Shell’s root folder.
shellfoundry installGenerating the Shell’s data model file
The shell’s data model (data_model.py file) consists of the standard specifications and the extended data model, which is defined in the shell-definition.yaml file. The shell’s data model is mainly used to work with resource attributes and implement the Auto-discovery process. For additional information, see Managing the Shell’s Data Model.
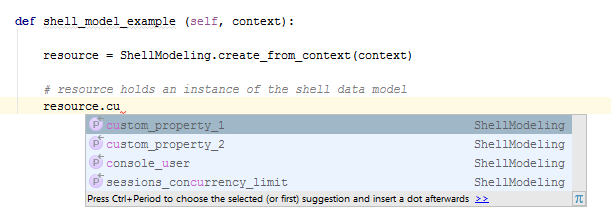
After importing the data_model, PyCharm (and some other IDEs) will recognize the docstring code-hint annotations and will enable autocomplete as you can see below:

Syntax:
Run this command from the Shell’s root folder.
shellfoundry generateCustomizing a 2nd Gen Shell
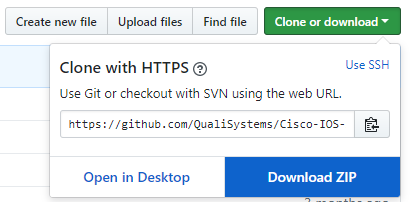
This command downloads the source code of the Shell you wish to customize to your local machine and updates the Shell’s Author with the author specified in Shellfoundry. Note that extending official Shells (Shells that were released by Quali) will remove their official tag. For more information, see Customizing a 2nd Gen Shell.
Syntax:
Run this command from the directory that will contain the new Shell:
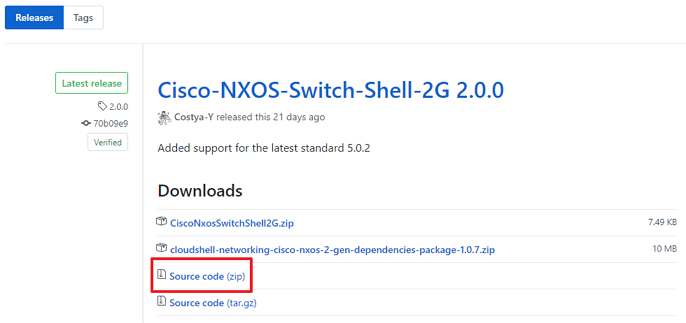
shellfoundy extend <URL/path-to-Shell>The path can be a URL to the source code of the shell’s desired release on Quali Community’s Integrations page or the filesystem path (prefixed by local:./) to the extracted source code folder:

Examples:
Extending a Shell residing on GitHub:
shellfoundry extend https://github.com/QualiSystems/Cisco-NXOS-Switch-Shell-2G/archive/2.0.0.zipExtending a local Shell:
shellfoundry extend local:C:\temp\Cisco-NXOS-Switch-Shell-2G-2.0.0Before extending a local Shell, make sure the Shell’s destination folder is different from the original Shell’s root folder.
Version History
1.2.16 (2020-01-02)
- Fixed password modification error
- Fixeed cookiecutter version incompatibility
1.2.12 (2019-10-16)
- Added
--pythonattribute tonewcommand that allows setting the python version of the shell
1.2.10 (2019-04-22)
- Added attribute to
distcommand that allows using locally installed shell dependencies when packaging the dependencies zip - Added support for pip 19.1
1.2.8 (2019-03-06)
- Fixed issue in
generatecommand after renaming root folder - Added
get_templatescommand for downloading shellfoundry templates for offline mode - Added
deletecommand for deleting shells installed on CloudShell (supported in CloudShell 9.1 GA and up) - Implemented the capability to generate shell documentation based on the template
- Set strict python version
1.2.4 (2018-09-26)
- Removed unnecessary cloudshell-automation-api dependency from requirements
- Set static version for package ‘click’ in requirements.txt file. click==6.7
1.2.2 (2018-08-16)
- Fixed bug related to template verifications and standards compatibilities
1.2.1 (2018-08-13)
- Added dynamical determination of minimal CloudShell version from templates
1.2.0 (2018-07-26)
- Extended
newcommand behaviour for offline mode - Added validation to check if the template and standard versions are compatible
1.1.9 (2018-05-03)
- Added offline mode functionality
- Fixed typo in
packcommand behavior - Added new online template for Cloud Provider
- Shellfoundry now packs deployment options if any exist
- Added limitation installing a gen2 shell (regular/service) into a non-Global domain
1.1.5 (2018-03-01)
- Added new online template for Traffic Generator Controller Service
- Added new 2nd Gen online template for Traffic Generator Chassis
1.1.2 (2018-01-09)
- Enhanced
extendcommand logic - Added new online templates
- Added specific error message to Layer 1 Shell
packandinstallcommands
1.1.0 (2017-10-30)
- Added
authorfield to shellfoundry configuration - Added
extendcommand behavior - Added verification when upgrading an official shell to unofficial
- Fixed some inconsistencies relating to the
extendandnewcommands, specifically around the shell name
1.0.3 (2017-06-28)
listcommand aborts if there is a new major version on pypi- Old Shellfoundry versions are NOT supported anymore. Therefore, in order to upgrade to the newest version, please run this command:
pip install shellfoundry -Unewcommand aborts if there is a new major version on pypinewcommand now conforms to CloudShell naming ruleslistcommand now shows templates that are installable on your cloudshellnewcommand now creates the latest version of the template that matches the standards installed on your cloudshell- When running
neworlistcommands, a notification is displayed if a new Shellfoundry version is available
0.2.7 (2017-05-16)
- Shellfoundry now packs categories.xml, if it exists
0.2.6 (2017-03-14)
- Minor bug fixes
0.2.5 (2017-03-13)
- gen2/resource is the now the default template for the
newcommand instead of gen1/resource listcommand filtering parameters have changed (legacy => gen1, TOSCA => gen2)- Added another filtering parameter: –layer1
- Minimum CloudShell version column appears in the
listcommand’s output table - gen2 is now the default view for list command
confignow echoes all default configurations if they have not been overridden by the userconfigcommand now encrypts the passwordshowcommand was added to display all available versions of a template- A new option was added to the
newcommand called –version. It enables template versioning on Shellfoundry. - Fixed a bug with the
configcommand, which caused Shellfoundry to crash if a config file was missing listcommand is now able to filter results based on shell type (–tosca, –legacy, –all)configcommand was added to allow setting configuration globally for all Shells in addition to local configuration- Pack Shell icon if specified in the shell-definition.yml file under
metadatatemplate_iconfor TOSCA based shells - Update reference to cloudshell-rest-api 7.2.0.7 to use PUT method in update shell
- TOSCA support was added to the
packandinstallcommands generatecommand was added to generate the Shell driver’s data model in Python
0.0.32 (2016-08-10)
- Dependency for git was removed
- Local Shell templates are supported
- Proxy support was added for access to github
0.0.31 (2016-08-04)
- git prerequisite were removed. Shellfoundry now works even if git is not preinstalled
0.0.28 (2016-07-07)
- Bug pertaining to the installation of packages in CloudShell was fixed
0.0.26 (2016-06-23)
- Images copied to the DataModel folder (Issue #21)
0.0.17 (2016-05-25)
- Fixed anj error message that is displayed when
installcommand fails in logging in into CloudShell
0.0.1 (2016-05-15)
- First release on PyPI
 CloudShell Developer Guide