Deploying to Production
In this section we’ll discuss the procedure of packaging and readying a Shell for deployment in a production environment. This diagram, that we’ve visited before, illustrates the development flow for Shells:
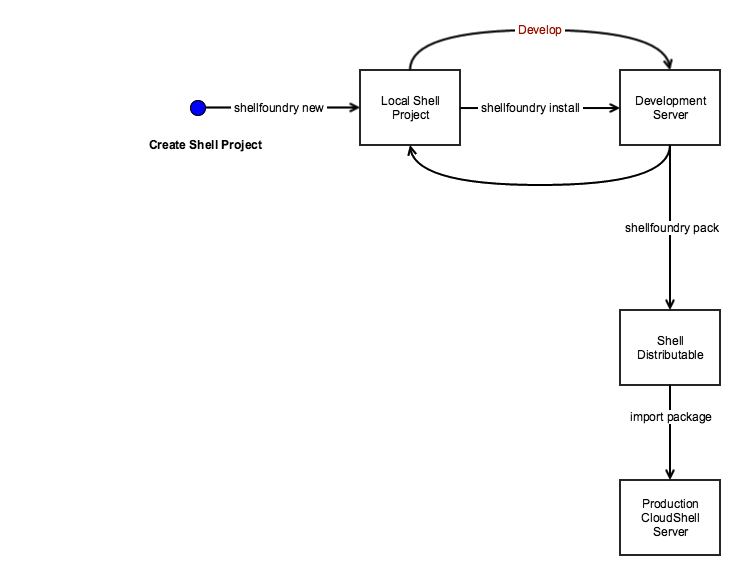
We’ll be concentrating on the last two phases in the above diagram - creating a distributable package and deploying it to the production server.
Creating a distributable package
To create a distributable package which can be imported to CloudShell, run the following from Command Line, make sure you are in the root directory of the Shell project:
shellfoundry packThis will create two artifacts in the ‘dist’ sub-folder of the Shell project:
- A zip file archive called <shellname>.zip - This is the Shell distributable package
- A folder named offline_requirements - The Python packages required by the Shell. This folder should be used with any offline execution servers, i.e. execution servers where pip will not be able to reach the internet to download the packages specified in requirements.txt
Adding custom attributes to the Shell
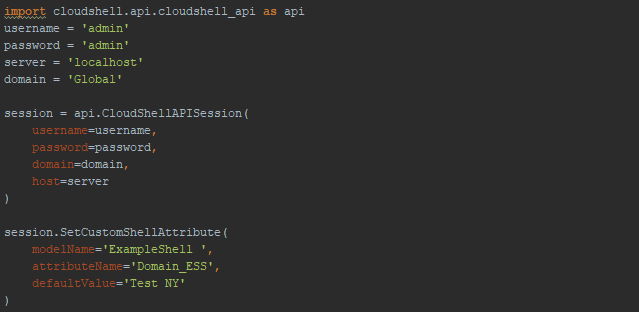
In this section, we will explain how to add an attribute to a specific 2nd Gen shell and customize the attribute’s defaults. This is done using the SetCustomShellAttribute API method, available in the TestShell XML RPC and CloudShell Automation API.
CloudShell distinguishes between two types of attributes.
- Attributes related to the device or shell, like Firmware Version or Port Speed
- Attributes related to your CloudShell deployment, like Execution Server Selector.
Note that deployment-related attributes are added to the shell by the CloudShell system administrator while attributes related to a device are added to the shell by the shell’s developer.
Notes: The below configurations only apply to attributes that already exist in CloudShell. When upgrading the Shell, these custom attributes and their association with the Shell will not be overwritten.
The required inputs are:
- modelName = The Shell’s model [the Shell name; case-sensitive]
- attributeName = The attribute’s name [case-sensitive]
- defaultValue = The default value
- restrictedValues = [optional] Comma-separated list of possible values
In this example, we are adding an Execution Server Selector attribute named “Domain_ESS” to a Shell named “ExampleShell” with “Test NY” as the default value:
Enabling Shell commands to run in offline mode
Before deploying to the production environment, it’s important to make sure that your Execution Servers will be able to execute the Shell commands, even if your CloudShell deployment is configured to run offline and can’t retrieve the Shell dependencies. If this is the case, simply copy the content of the offline_requirements folder to your local PyPi Server repository. For more information, see Configuring CloudShell to Execute Python Commands in Offline Mode article.
Deploying to the production CloudShell Server
To deploy the Shell to the production CloudShell server:
1) Log in as an administrator.
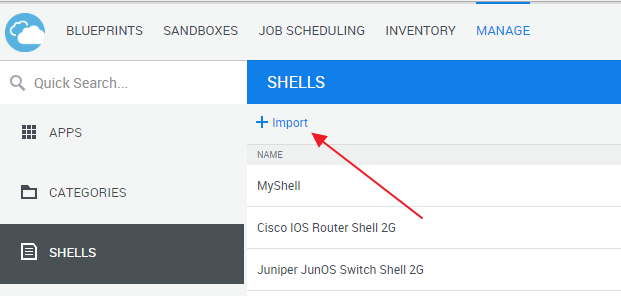
2) Import the shell into CloudShell. You can use the shellfoundry install command-line, or import the package manually.
To manually import a 2nd Gen shell, in the Manage dashboard, open the Shells page and click Import.
For 1st Gen shells, open the Admin menu located at the top of the page, and select Import Package.
3) Select the Shell zip file created earlier and click Open.
Your Shell should now be ready for use in the production environment.
Share status
Each of the shell’s resource levels is defined in the shell standard as a resource family and has a share status. The share status determines whether a specific resource or sub-resource of a particular family can be used in different sandboxes at the same time. A family’s share status is determined by the Locked By Default rule, which when set to True defines the family as unshared. More about family properties can be found in this CloudShell Help article. To find out the share status of a specific family in your shell, have a look at the shell’s standard. For example, the Shell Resource Standard’s Data Model Structure section indicates its families’ settings.